Purpose


A blog to share about Adrenal insufficiency, Addison's Disease, Aspergers Syndrome, Autism, Music, Inspiration, Scrapbooking and other elements viewed through the lens of my life. I'm hoping that others who are traveling this journey may find some commonality, and maybe some information and inspiration.

Monday, November 26, 2012

ArtStudio: Using the Adjust Options


 Now for more fun with effects! Here is the file I'm starting out with, the same one I used as a basis for the previous post about Blending Modes. Today we'll explore the Adjust options:


The first one on the list is Brightness/Contrast/Exposure. Here's a sample with combined adjustments of all three: 


Next on the list is Hue/Saturation/Lightness:


Curves gives you a lot of control:


You can add an adjustment point by tapping on the adjustment curve. allowing you to fine tune various aspects of the image:


And you can control specific color channels:


You can see here, you can combine various channel adjustments:


And here's an example of playing with the Alpha:


Some examples of Color Balance control:


Temperature/Tint sliders:


Shadows/Highlights:


Posterize:


I didn't get a screen shot of Invert Colors. Here is Black and white, which is a good first step to recoloring the layer.


I selected a color from the swatches and chose Colorify, a super easy way to make things match whatever color palette you are playing with:


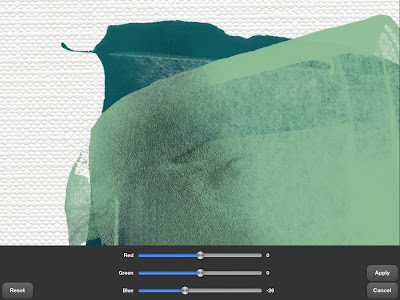
For this one, I reverted to my original file and selected Color to Transparency. 


The Adjust menu also contains Auto Contrast, Auto Colors and Auto White Balance, which would be most useful on photographs that need a bit of adjusting.

Next up: the Select and Layer menus

Sunday, November 25, 2012

ArtStudio: New File and Brining in Digi Goodies


To start a new project, select New from the File menu. The drop down menu gives you options depending on your iPad version, and your project. While it looks like I can pick the iPad with Retina option, since I don't have the new iPad, selecting this option causes ArtStudio to crash, so I don't recommend going that route without the proper equipment. 

Once you have selected the correct document size, this is what the rest of the New Image window looks like.  I normally choose White background, just like I would in PSE. 


Now the document is ready to start creating!

I store the digital files I'm going to use in Dropbox. This saves space on my already-space-challenged iPad. Generally I pull my photos off PhotoStream, but you could certainly create a project folder in Dropbox to contain everything you plan on using. 

Here is a screen shot of my Dropbox folder which contains the files I made from Anna Aspnes' ArtzyCards Crazy Life with the background I am going to select for this tutorial. I choose Copy Image to Clipboard.


Double-click the home button, go to ArtStudio. Select File>Import>Insert as a Layer>Paste from Clipboard. Hopefully Dropbox integration will be coming as a feature to make this a quicker process. It has been requested and the developer is looking at it.


Repeat the process to bring in other items you want on your page. Here is a screen shot of the background plus a transfer, with no blending modes applied.


Here is what the Blending modes pop-up looks like:


And here are some screen shots with various blend modes applied to the transfer layer. As in Photoshop or PSE, you just have to play with the various modes to see the effect, which varies depending on the characteristics of the layers. This addition of blend modes makes me a very happy mobile scrapper! I love the texture that shows through with Multiply:


Here is Burn:


Subtract:


Grain Extract


Grain Merge:


There is an opacity slider so you have a lot of control over each layer effect. Here is the original Multiply mod with the opacity at 39%:


Next up: Layer Adjustments


Friday, November 23, 2012

New Project: Music Wreath


I've been wanting to make a music wreath for a long time to put in my studio. I finally decided it was time. But it has to be fairly easy since I'm not a great paper crafter. I found this pattern:

http://www.ellinee.com/blog/freebie-friday-diy-paper-rose-templates/

This fits the bill nicely. The roses are exactly what I was thinking of, but now that I've made a few, I really like them. The pattern is a free download, and all I have to do is print it on my music pages, cut them out, and follow the easy assembly directions.

I'm using old music books that students who have moved have given me - student books that for some reason aren't likely to get used for actually making music by anyone. Anything that is really useable I give away to students.

I'm inking the edges with Tim Holtz Distress Ink in Walnut Stain for the petals and Versacolor Evergreen for the leaf edges.

I'll post more when the wreath is actually done. I have a lot of roses to make still, so don't hold your breath!

Patti

Black Friday


Instead if shopping, I took my granddaughter to see the Aulani Disney Resort. We both had a great time. It's s great way to spend Black Friday.

Patti

- Posted using BlogPress from my iPhone

Sunday, November 18, 2012

Just Playing

I felt like playing with ArtStudio on my iPad to tonight. Here's the result:


I had drafted a much longer post, which disappeared. I'll post a bit on the process after I've gotten some sleep.

Digital goodies I used are fromAnna Aspnes' Crazy Life.

Patti

- Posted using BlogPress from my iPad

Saturday, November 17, 2012

Happy Saturday


This lovely bloom greeted me in the garden yesterday. I do love living where the flowers are blooming in November! Even though today our wet, cool weather has set in. Actually, I'm glad. We had lots of hot Kona weather in Sept. and Oct. so I'm ready for a bit of cooler wetter weather. And we need the rain.

I got my Olloclip this week, so I had to experiment. The biggest trick is holding the camera still enough when using the macro lens, and in this case, catching the flower while it was still rather than bobbing in the breeze.


Both photos shot with my iPhone 4S and edited with Snapseed and Instagram.

I'm off to pick up a few yummy things at Whole Foods. Happy Saturday to you!

Patti

- Posted using BlogPress from my iPad

Thursday, November 15, 2012

ArtStudio Basics


Here's a brief look at the ArtStudio options. This is the screen when you first open the program. The menu options are at the top, the tool palette on the left, and the color palette on the right. The bottom has options that apply to the current tool. There are more tools and colors than appear - you just scroll down to see the rest.


This is the layer palette pop-up. The plus icon adds a new layer, the next control duplicates the current layer. The third merges the layer with the layer below. The mask icon should be familiar from Photoshop or PSE. And of course the trash can deletes the layer. At the top you can see the opacity slider, and there is a drop down menu for the blending modes. Just tap where it says "Normal" and the other options appear.


Each tool has it's own pop out for controls and options particular to that tool. There are many control options here. Make sure you scroll down to see the rest of the controls. You can select the size and hardness of the tool, specific shapes, as well as fade in and out. There are a lot of options available for fine control.


There is a nice variety of brushes included, and an additional set you can purchase. I went ahead and bought the extra set of brushes since I love to use brushes! Again, there is a long list of options for brush settings. Scroll down for more options.


When you select the type tool, the keyboard pops up along with the options for font, font size, color, and alignment.


On the right color panel, the top swatch shows the current foreground and background colors. Double tapping opens up the color picker/sliders. You can change the selection of swatches by dragging the new color to one of the swatch squares. 


Coming soon: Opening a new file, and bring in your supplies into ArtStudio.

Patti

Saturday, November 10, 2012

Prepping Digi Supplies for iPad use.


This part of the process is a bit tedious if you want to have lots of supplies available for use on your iPad. I'd recommend starting out with a few select items you're pretty sure you want on your page. You can always resize more items later once you've been bitten by the bug.

The first thing I do (and I learned all this at Renee Pearson's iScrapIt class - highly recommended!) is open the digi supplies I plan on using in PSE (I'm in version 9 right now) and resize them to fit the iPad dimensions. My iPad v. 1 is 1024x768. You can either crop to that size or change the file dimensions to close to that size. I love to use Anna Aspnes' ArtsyKardz. The dimensions are almost correct. The ArtsyKards are just slightly longer.

For resizing the file: Go to Image>Resizie>Image Size. When you resize, remember to check Scale Styles, Constrain Proportions, and Resample Image: Bicubic Sharper (best for reduction). If you type 768 px in the height, your file will fit nicely on the iPad screen, with a little extra length.

Of course if you crop, you can set the crop tool to the exact dimensions. This is my default mode of prepping files for the iPad


I take this a step further with Anna's ArtsyKardz since they come as PSD files as well as JPGs. I save each layer as a separate PNG file so I can mix and match as I please. Sometimes there's a great element that has to get cut off in the crop, and when that is the case, I undo the crop for that layer and redo it to include the entire element.

If I was in Photoshop and knew how to create actions, I'd make one for this process! It does go pretty quickly once you get going.

I save all these modified files to Dropbox. You can theoretically add files to ArtStudio via iTunes, but then you are adding what has to be stored on your iPad. Plus this action seems to be a bit glitchy on my iPad - it may be because it's older and the newer version of ArtStudio is made to take advantage of the newer iOS - I can't upgrade due to no camera :(

At any rate, I like having the files in Dropbox even though I have to switch between programs when I bring in a new file to the page. That way I can have plenty of options available to use without overloading my iPad.

It's entirely possible to make a great page in ArtStudio without going through all of this if you want to make graphic, simple pages without embellishments. I personally like to play with both clean and simple and more artsy pages, so this method suits me.

Next up: A brief intro to the ArtStudio interface.

Patti
Friday, November 9, 2012

iPad Scrapping with Art Studio


I recently made the wonderful discovery that ArtStudio is an amazing iPad app for scrapbooking. Last summer I took iScrapIt at Renee Pearson's. It was a fantastic class teaching how to scrap on an iPad using Keynote.

The pages work well with a small amount of trimming printed out as a landscape 8.5x11 photobook. They can also be added to a 12x12 page in Photoshop or PSE.

But since Keynote is designed to be a program for creating presentations, it doesn't have the artsy features like blend modes, masks, and adjustment layers.

But the latest version of ArtStudio has all that and more!

The page above was created today using ArtStudio and items from Anna Aspnes's This Crazy Life. Her ArtsyKardz are almost the right proportions for the iPad (I'm using a first generation iPad, so I have fewer pixels on my screen than the new version - if you're lucky enough to have the new one, you will have to adjust accordingly), and.since ArtStudio reads PNG files, all elements from a kit are also accessible.

I still have some work to do on the page, mainly cleaning up the layer mask. I took full advantage of blending modes and adjustments to create the page.

I plan on doing a small series of posts on scrapping in ArtStudio in case any iPad users who scrap happen to stumble here.

Next up: prepping the kit for iPad use and making them accessible to Art Studio.

Patti
- Posted using BlogPress from my iPad

Friday, November 2, 2012

November's 30 Days of Thankful


I have decided to participate in a project that Cathy Zielske is doing on her blog, 30 Days of Thankful. Since my One Little Word this year is Grateful, this is a good way to keep that topic in the forefront as I go through November.

I'm creating the pages digitally, printing them on matte photo paper and then handwriting the journaling.

I'm not using Cathy's predesigned pages, but I'm copying them as closely as I can, with different papers. The kit I'm using is from The Digi Files, Warmth of a Family kit by Amber Shaw, part of the November supplies if you are a Digi Files member. This is the first time I've used any of Amber's designs, and these papers were just what I was looking for.

Cathy was the first scrapbook designer whose style I absolutely loved, and it remains a favorite still. I'm not a fussy details person in general, so clean and graphic works great for me. Except when I'm the artsy, messy person! Clean and Simple is still my scrapbooking default, and it makes putting an album like this together a piece of cake.

I didn't get prepared for this project until today other than buying an American Crafts 6x6 Modern Album, but it was a pretty simple matter to create my templates for each page, pick a couple of topics and photos, and get caught up. The work on this will likely be done in batches when I have the time, but Cathy provides a free PDF for the project to make notes of the topic you want to journal each day and what photo you want for that page.

I love the 6x6 size - I need to do more projects this size. The only downside is the ink I'm going to have to buy to keep my printer humming along!

Here's day 1 & 2:


The cover of my album is a work in progress right now. Since it's an American Crafts Modern album, I'm playing with inking, painting and who-knows-what-else on the cover. A photo may show up here when I'm done.

Patti